Importing Contacts
Your contact database lives under Contacts in the left navigation. From there you can browse and search contacts, build audiences (lists/segments), add a single contact, or bulk-import from a CSV file.
The Contacts page
The All Contacts tab shows an overview — total contacts, new contacts, total audiences, and active contacts — followed by a searchable table (name, phone, email, audiences, last contacted). You can filter by channel and date, and open any contact's menu (⋯) to view or edit them. The Audiences tab manages your lists and segments.
Two buttons sit at the top right: Add Contact (one at a time) and Upload contacts (bulk CSV import).
Adding a single contact
Click Add Contact and fill in the details — name, phone number(s), email, and any custom fields. This is the same record agents see in the conversation contact panel.
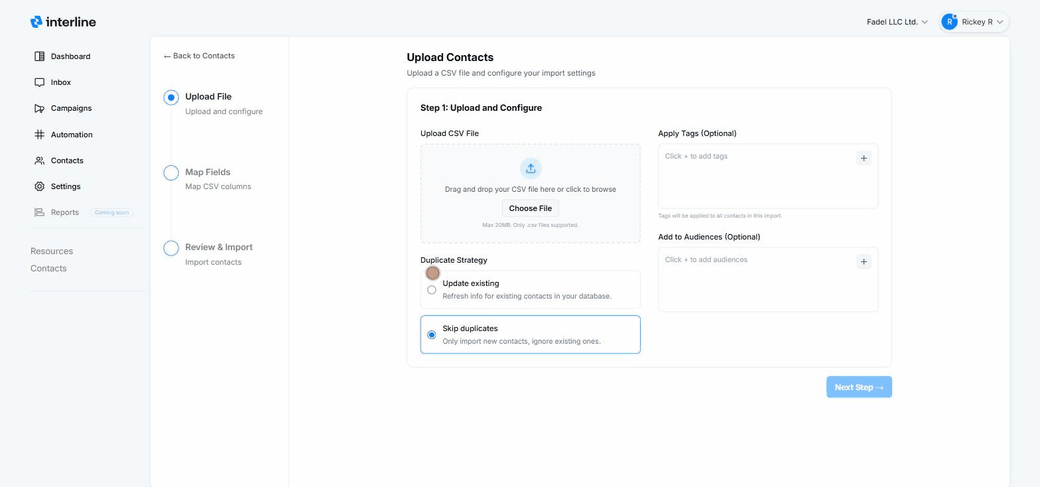
Bulk import from CSV
Click Upload contacts to open the import wizard. It has three steps: Upload File → Map Fields → Review & Import.
Step 1 — Upload & configure
- Upload your CSV by dragging it in or clicking Choose File (max 20 MB,
.csvonly). - Apply tags (optional) — tags added here are applied to every contact in this import, which is handy for labeling a batch (e.g. a tag for the event or source the list came from).
- Add to audiences (optional) — drop all imported contacts into one or more audiences so they're immediately ready for campaigns.
- Duplicate strategy — choose what happens when a contact already exists:
- Update existing — refresh the info for contacts already in your database.
- Skip duplicates — only import new contacts and leave existing ones untouched.
Then click Next Step.
Step 2 — Map fields
Match the columns in your CSV to Interline's contact fields (name, phone, email, custom fields). Good column headers in your file make this quick. Mapping means your spreadsheet's columns don't have to match Interline's field names exactly — you just line them up here.
Step 3 — Review & import
Review the summary — how many contacts will be created vs. updated — and confirm to run the import. Imported contacts appear in All Contacts and in any audiences you selected.
Prep your file first
A clean CSV imports best: one header row, a column for phone and/or email, and consistent phone formatting (include the country code, e.g. +1…). Phone or email is what lets Interline message the contact, so make sure at least one is present.
Audiences
Audiences are the lists and segments you send campaigns to — either Manual (fixed lists) or Dynamic (rule-based, self-updating). You can drop imported contacts straight into an audience during step 1 above. For the full details on creating and using them, see Audiences.
Tags and audiences are what power targeted Broadcast campaigns and Keyword sign-ups, so keeping contacts well-organized pays off when you send. You can also add your own custom fields and tags to store and segment on business-specific data.